Want to build your postcard offline in Photoshop or Illustrator?
You can, just keep some very important details in mind:
Do NOT add a QR code to your design. ChurchStamp tracking relies on the QR code generated by our system, so you will need add the QR code to your design WITHIN the ChurchStamp app.
create your postcards using the design tools of your choice
export them as .JPG files following the precise instructions below, and
import the front and back images of the postcard into ChurchStamp.
continue to edit the template in the ChurchStamp editor (layering in personalization and tracking)
proof the template
(Note: We require export as .JPG images, NOT .PDF files).
Overview – How To Properly Save Images For ChurchStamp Using Adobe Tools
While ChurchStamp requires that direct mail templates get finalized and proofed in our online editor, we also make it really easy to build direct mail postcards offline in tools such as those from Adobe®.
Download Adobe® Direct Mail Template Zip File
Go to the section of the article describing how to output from:
Designers who are comfortable using these tools can build in their preferred environment, upload the files into ChurchStamp and still take advantage of the most modern, connected, and trackable way to generate workflow campaigns.
Often, designers who build direct mail postcards offline will use the unique personalization and tracking tools that the Direct Mail Editor can overlay on postcards. These options can be layered on within minutes of uploading the offline-built images. When combined with the unique Smart Send and Triggered Drip campaigns, offline-created postcards can truly become part of a digital marketing infrastructure.
Build Direct Mail Postcards Offline With Image Files (JPG or PNG)
Often, designers are accustomed to using Adobe® tools to generate PDFs for review by decision-makers, print partners, and others. With ChurchStamp, designers only need to generate image files using offline tools.
We recommend saving your design as a JPG or PNG file at 300 dpi, with the exact bleed dimensions specified below. JPG is probably your best bet, as PNG files sizes can get very large.
Our maximum allowable file size is 5MB per image.
Use PNG for images that require transparency, like a logo. Background images should be saved in JPG format.
Why output direct mail templates as image files rather than PDFs? Because ChurchStamp templates are stored as HTML! Your image will be loaded into a web-based editor for final production and proofing. There are several advantages to building direct mail templates and saving them as HTML – personalization, copying, and editing become a breeze!
Postcard Guidelines
These Adobe® templates show specific guidelines for designers who wish to build direct mail postcards offline to upload to ChurchStamp. Maintaining your artwork within the guidelines will ensure a simple and easy upload process.
The templates also include a postcard design example to provide inspiration and show how to maintain your artwork within the guidelines.
The template sizes are available in 4×6, 6×9, and 6×11 in both portrait and landscape layouts.
Landscape Layout:
4″ x 6″ (Landscape) 120# (14PT) gloss cover, UV coated
6″ x 9″ (Landscape) 120# (14PT) gloss cover, UV coated
6″ x 11″ (Landscape) 120# (14PT) gloss cover, UV coated
Front Portrait Layout:
4″ x 6″ (Front Portrait) 120# (14PT) gloss cover, UV coated
6″ x 9″ (Front Portrait) 120# (14PT) gloss cover, UV coated
6″ x 11″ (Front Portrait) 120# (14PT) gloss cover, UV coated
Template Guidelines (Landscape Layout)
-medium.png)
-medium.png)
Template Guidelines (Front Portrait Layout)
Only the front side of the postcard has a portrait layout. The backside maintains a landscape layout.
-medium.png)
-medium.png)
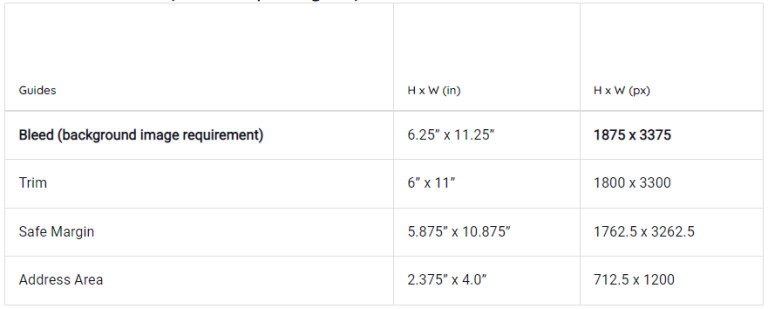
Safe Margin, Trim, Bleed & No Crop Marks
Safe Margin
Keep all text within this boundary to ensure it does not get cut off during printing.
Trim Line
The actual size of the postcard after it has been cut by the printer.
Bleed – the exact dimensions of your background images
The area that extends beyond the trim line, thus being the overall document size.
The Bleed is the exact dimension of all background images in ChurchStamp. It is the portion of your design that you extend past the Trim or “cut” lines of a printed piece. This is done to ensure that you don’t end up with white lines on your mailpiece due to slight variances in the printing process.
No Crop Marks or Trim Marks
Often, designers who’ve worked on artwork that ends up being printed by commercial printers add “Crop Marks” or “Trim Marks” to the images to help with the printing process. ChurchStamp templates DO NOT use crop/trim marks, so do not add them or make sure that they are removed prior to finalizing your artwork. Below is an example of these marks that you’ll want to remove.
All background images or artwork that you want to upload into ChurchStamp must be the exact dimensions of the bleed areas listed below.

Dimensions (Landscape Layout)
Key
H = Height W = Width in = inches px = pixels
4” x 6” Postcard (Landscape Layout)

6” x 9” Postcard (Landscape Layout)

6” x 11” Postcard (Landscape Layout)
Dimensions (Front Portrait Layout)
Only the front side of the postcard is a portrait layout, the backside maintains a landscape layout, therefore the dimensions listed below are for the front side of the postcard only.
Please follow the landscape dimensions for the back of the postcard.
Key
H = Height W = Width in = inches px = pixels
4” x 6” Postcard (Front Portrait Layout)

6” x 9” Postcard (Front Portrait Layout)

6” x 11” Postcard (Front Portrait Layout)

Design Example: Front (Landscape Layout)
The front of the postcard provides an open canvas to design. Reach your audience with bold images, personalization, and clear messaging.
Adding Personalization With Variable Data & Variable Logic
Design the look and placement of variable data and variable logic but when saving and exporting documents you must leave variable content areas blank; variable data and variable logic will be added online in the ChurchStamp postcard editor.
What is Variable Data?
Information derived from a contact list that populates designated content areas in emails, landing pages, and direct mail to personalize the viewer experience.
What is Variable Logic?
Content that differs between viewers based on their unique information in a contact list. Variable logic makes designs more personalized, efficient, and readable.
Bi-fold Self Mailer Postcard Template Guidelines
Self Mailer Template Guidelines (12x9 Bi-fold Layout)


Self Mailer Template Guidelines (6x18 Bi-fold Layout)

Key
H = Height W = Width in = inches px = pixels
12” x 9” Bi-fold Self Mailer

6” x 18” Bi-fold Self Mailer

Saving & Exporting
To ensure an easy upload and print process, follow the saving and exporting guidelines. The process varies between Adobe Photoshop®, InDesign®, and Illustrator® so follow accordingly.

Photoshop® (Recommended)
Want to build an Adobe Photoshop® postcard? It’s easy!
When saving and exporting your front and back postcard in Photoshop®, it is very important to turn off or delete the Specs, Guides, and Design Example layers.
Turn off Layers
In the layers panel, click the eyeball to turn OFF each layer (Specs, Guides, and Design Example).
Delete Layers
In the layers panel, click the lock to unlock layers, (Specs, Guides, and Design Example), then click each layer to highlight and drag to the trash can in the right-hand corner.
Variable Content
Leave areas that will contain variable content (variable data, variable logic, pURL) blank. You will add variable content in the ChurchStamp editor.
Resolution
Your file needs to be 300 dpi for the best print quality. To check your resolution, Select Image>Image Size. The Image Size dialogue box will open. Next to the Resolution should be 300 pixels/inch.
Exporting as JPEG (Recommended)
Convert CMYK to RGB for creative
Select File > Export > Export As…
Dialogue Box Opens
Format select JPG
Quality select 100%
Color Space options select “Convert to sRGB ” and “Embed Color Profile”
Click Export All
Name your file and save
Exporting as PNG
Convert CMYK to RGB for creative
Select File > Export > Export As…
Dialogue Box Opens
Format select PNG
Color Space options select “Convert to sRGB ” and “Embed Color Profile”
Click Export All
Name your file and save
*NOTE: YOU CAN ALSO EXPORT JPGS IN CMYK COLOR MODE, BUT MAKE SURE THE COLOR SPACE OPTIONS STATED ABOVE ARE SELECTED.
*NOTE: Export each Photoshop® page individually to create separate front and back postcard files to upload.

Adobe® InDesign®
There are a few key suggestions for building an Adobe® InDesign® postcard front and back for ChurchStamp.
When saving and exporting your front and back postcard in InDesign® it is very important to turn off or delete the Specs, Guides, and Design Example layers.
Turn off Layers
In the layers panel, click the eyeball to turn OFF each layer (Specs, Guides, and Design Example).
Delete Layers
In the layers panel, click the lock to unlock layers, (Specs, Guides, and Design Example), then click each layer to highlight and drag to the trash can in the right-hand corner.
Variable Content
Leave areas that will contain variable content (variable data, variable logic, pURL) blank. You will add variable content in the ChurchStamp editor.
Converting Text to Outlines
When fonts can’t be embedded in exported files, prevent upload errors by converting all text to outlines. Highlight all text, Select Type > Create Outlines.
Resolution
Any image you place into InDesign® needs to be 300 dpi. In the export process, you will also export your file in 300 dpi.
Exporting as JPG (Recommended)
Convert CMYK to RGB for creative
Select File > Export > Export As…
Dialogue Box Opens
Name your file
select JPEG for “Save as type”
click save
A new dialogue box opens
Under “Image” set Quality to High
Under “Image” set Format Method to Baseline
Under “Image” set Resolution to 300
Under “Image” set Color Space to RGB
Under “Options” select Embed Color Profile
Under “Options” select Simulate Overprint
Click Export
Exporting as PNG
Convert CMYK to RGB for creative
Select File > Export > Export As…
Dialogue Box Opens
Name your file
select PNG for “Save as type”
click save
A new dialogue box opens
Under “Image” set Quality to High
Under “Image” set Resolution to 300
Under “Image” set Color Space to RGB
Under “Options” select Simulate Overprint
Click Export
*NOTE: YOU CAN ALSO EXPORT JPEGS IN CMYK COLOR MODE, HOWEVER, DOUBLE-CHECK THE COLOR WHEN PROOFING TO MAKE SURE THEY MATCH. IF THE COLORS DIFFER, PLEASE PRINT FROM THE PROOFED PDF TO CHECK IF THE PRINT COLOR IS ACCURATE. IF IT IS NOT YOU MAY NEED TO ADJUST YOUR CMYK VALUES TO MATCH RGB COLOR VALUE REPRESENTATION.
*NOTE: EXPORT EACH INDESIGN®PAGE INDIVIDUALLY TO CREATE SEPARATE FRONT AND BACK POSTCARD FILES TO UPLOAD.

Adobe® Illustrator®
Follow similar rules when creating an Adobe Illustrator®postcard front and back.
When saving and exporting your front and back postcard in Illustrator® it is very important to turn off or delete the Specs, Guides, and Design Example layers.
Turn off Layers
In the layers panel, click the eyeball to turn OFF each layer (Specs, Guides, and Design Example).
Delete Layers
In the layers panel, click the lock to unlock layers, (Specs, Guides, and Design Example), then click each layer to highlight and drag to the trash can in the right-hand corner.
Variable Content
Leave areas that will contain variable content (variable data, variable logic, pURL) blank. You will add variable content in the ChurchStamp editor.
Converting Text to Outlines
When fonts can’t be embedded in exported files, prevent upload errors by converting all text to outlines. Highlight all text, Select Type >Create Outlines.
Resolution
Any image you place into Illustrator®needs to be 300 dpi. In the export process, you will also export your file in 300 dpi.
Exporting as JPEG (Recommended)
Convert CMYK to RGB for creative
Select File > Export > Export As…
Dialogue Box Opens
Name your file
Check Use Artboards
select JPEG for “Save as type”
click save
A new dialogue box opens
Under Image set Color Model to RGB
Under Image set Quality to 10 and Maximum
Under “Options” set Resolution to Screen 300ppi
Select Embed ICC Profile
Click OK
Exporting as PNG
Convert CMYK to RGB for creative
Select File > Export > Export As…
Dialogue Box Opens
Name your file
Check Use Artboards
select PNG for “Save as type”
click save
A new dialogue box opens
Under “Options” set Resolution to Screen 300ppi
Click OK
*NOTE: YOU CAN ALSO EXPORT JPEGS IN CMYK COLOR MODE.
*NOTE: Export each Illustrator® artboard individually to create separate front and back postcard files to upload.